Are you having trouble using Pay4SchoolStuff.com to pay your membership fees, donate to the annual campaign or pay for other miscellaneous fees?
If so here is the tutorial for you!
If so here is the tutorial for you!
Step 1 - Navigate to www.pay4schoolstuff.com
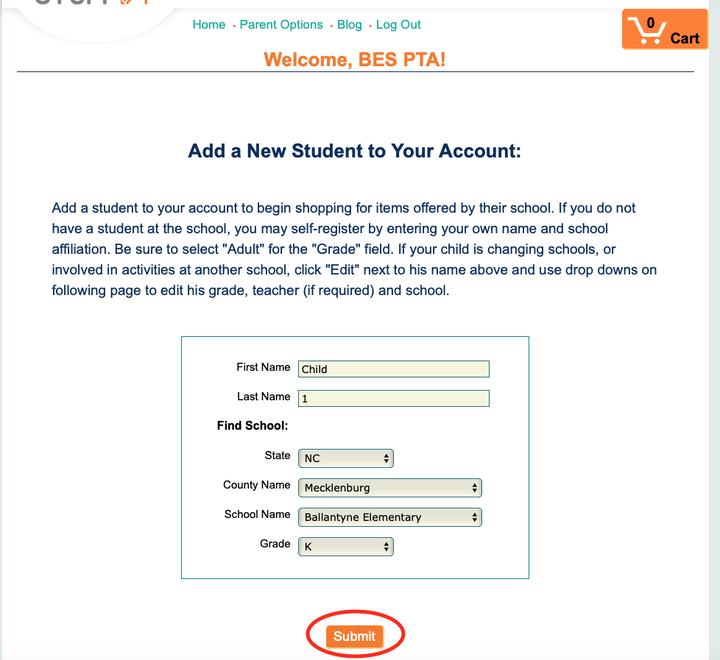
Step 2 - Add or Update Your Children
- In our example, below, we are a new family who has no children currently added.
- We filled out the form with the child's information and school information and click SUBMIT
- Repeat this process for as many children as you have - note that you can add children that are at different schools, you would just input the correct school information for that child
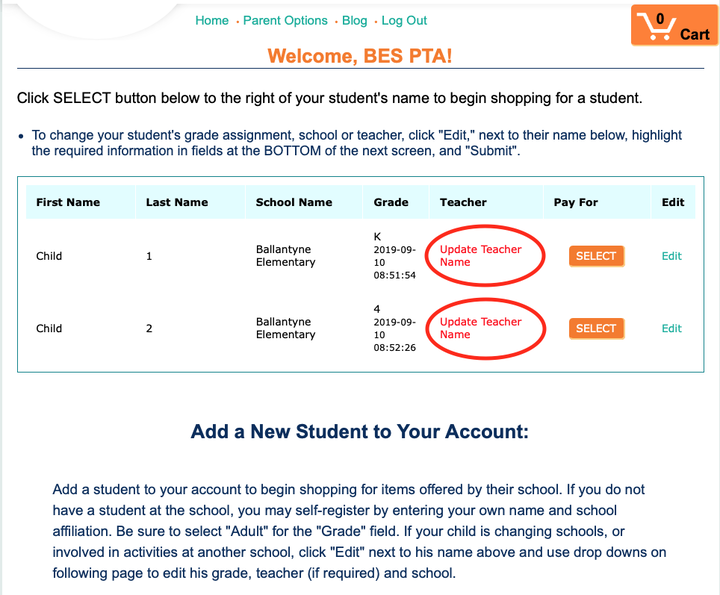
Step 3 - Update the teachers - whether you added new children or need to update their teacher for the current year, follow these steps
- Click "Update Teacher Name" next to your child's name
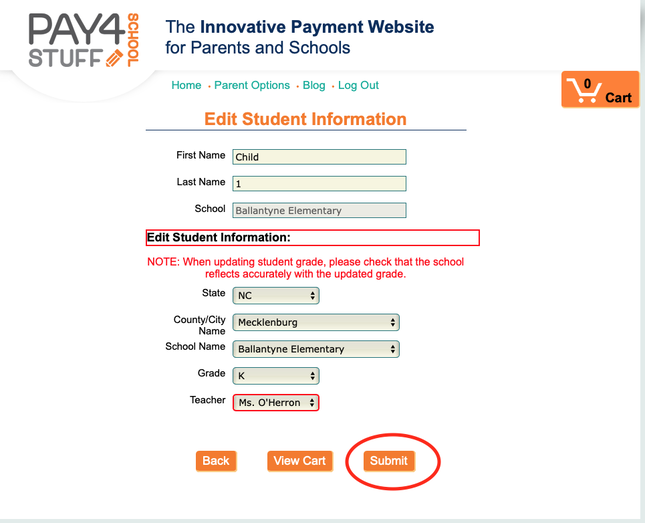
- Edit the student's information to the correct grade & then select the teacher from the drop down menu. All grades are pre-populated with the teachers for that grade.
- When the information is correct - click SUBMIT
- Complete this step for all children on your account that you need updated
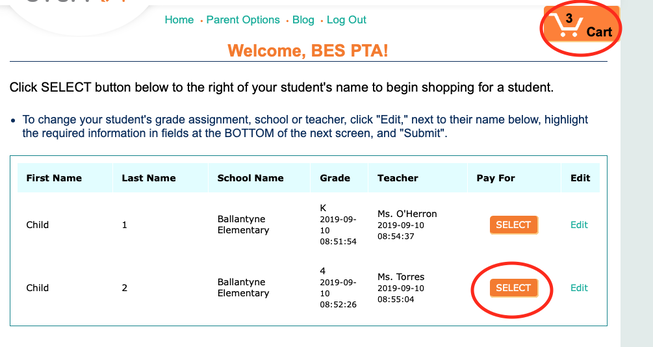
Step 4 - Begin Paying Fees
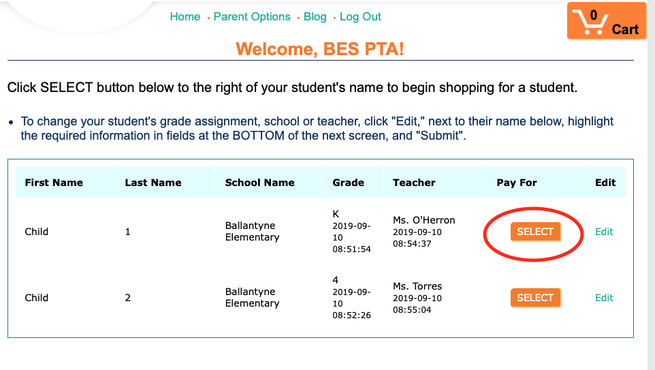
- In our example, we are going to pay fees for "Child 1"
- Click "Select" next to the child's name that you want to work on first.
- Select which item you would like to pay for first and click "Select" next to the name
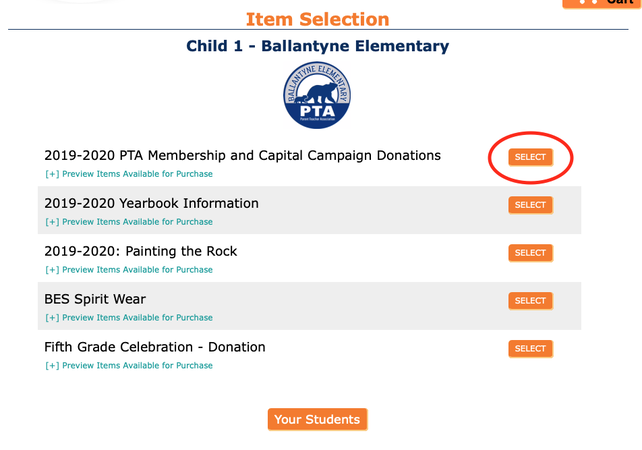
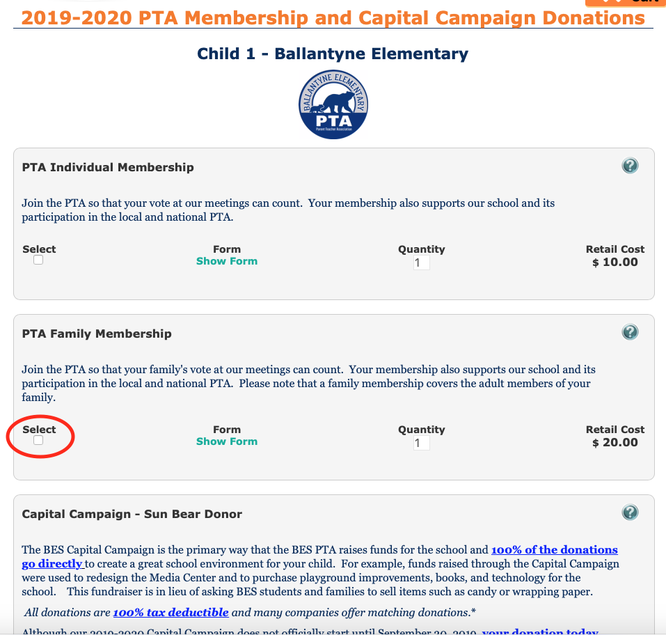
- In our example, we are going to pay for a PTA Family Membership
- Remember the memberships are based on the number of adults, not children. Individual is for one adult/parent/guardian and Family is for two.
- Click on the "Select" check box that is below the item that you are choosing
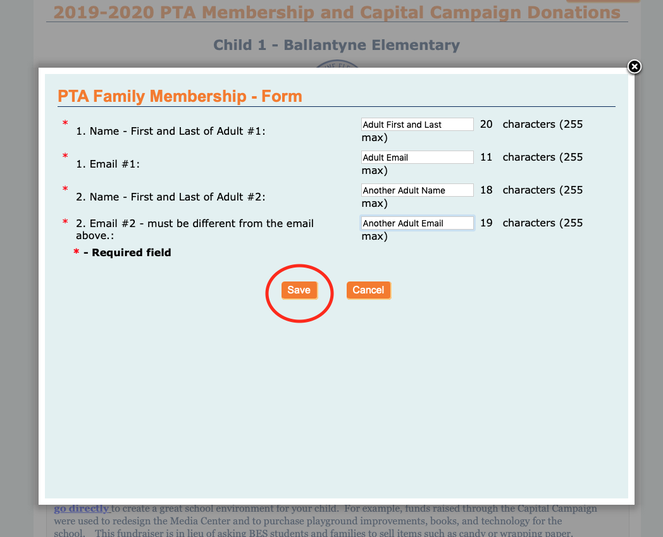
- When you make your selection, if there is additional information needed it will pop up a box like the one below.
- Fill out the requested information (in this case the names and email addresses of the adults) and then click SAVE
Step 5 - Paying Additional Fees from the Same Category
- In our example, PTA memberships are located under the same heading as the annual donations. We are going to take care of both right now so we don't forget to do it later!
- Scroll to select which donation level meets your family's needs. All of the "Bear Level" donations are pre-populated with the amount.
- Clicking on "SELECT" will add this set amount to your cart.
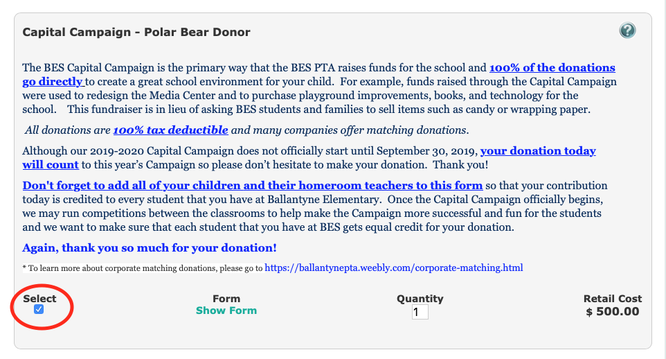
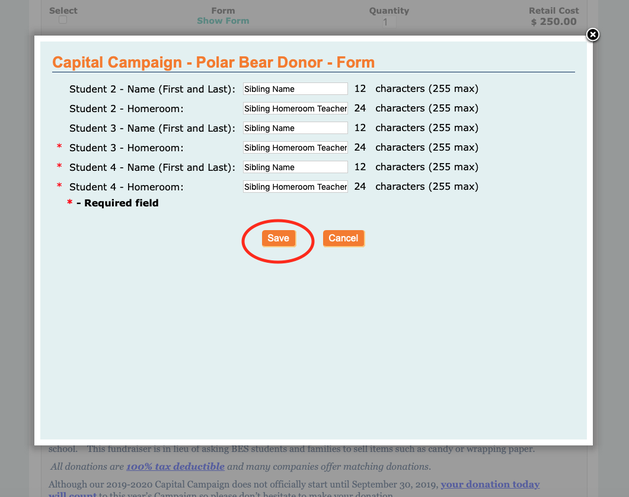
- When you click on the "select" box you will get a pop-up asking for more information
- For our example of the Capital Campaign we will need the names and homerooms of any other children you have unless you are paying for the donation for each child separately. This allows us to make sure each of your students are counted for annual campaign incentives.
- PLEASE NOTE - If you choose to pay for your children separately there is no need to fill out this pop-up.
- For example - I have 2 children and I want to donate $500. I can choose the Polar Bear donation under my first child and just add the other sibling's name in the pop up for both to get credit OR I can donate $250 (Kodiak Bear) for Child 1 and then another $250 (Kodiak Bear) under Child #2's account so each child gets credit.
- PLEASE NOTE - If you choose to pay for your children separately there is no need to fill out this pop-up.
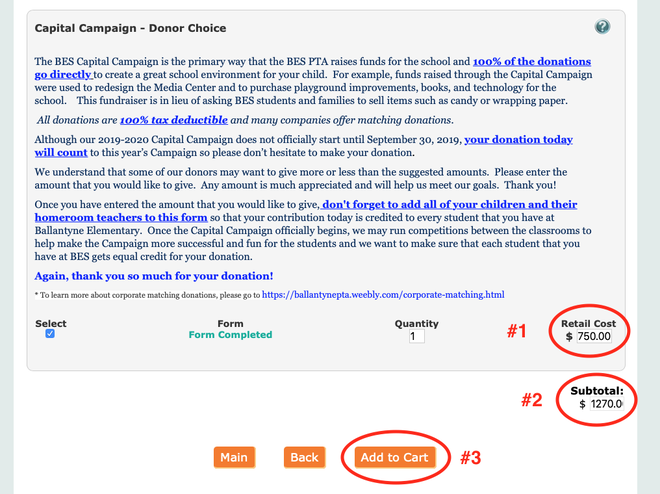
- If you choose the "Donor Choice" level, you can make your donation any amount that you would like.
- You will see a pop-up if you choose this level just like the Polar Bear example above (see the above notes for how to fill this out).
- Make sure to input your chosen amount into box #1 or you will donate $0.00
- Make sure your subtotal of any choices from above, plus the donor's choice amount, is correct in box #2
- In our example we had a $20 PTA membership, a $500 Polar Bear donation and a $750 Donor Choice Donation so $1,270 is correct.
- Click #3, "Add to Cart" to add the subtotaled amount to your shopping cart
Step 6 - Paying for Fees in Another Category
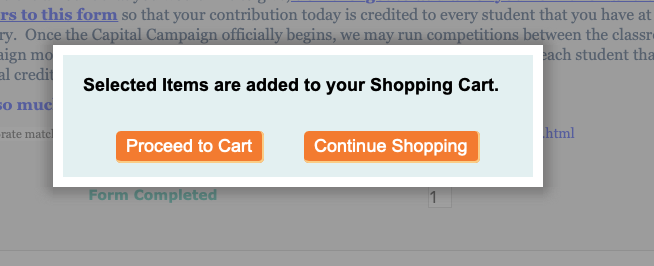
- Once you click "Add to Cart" this pop-up will appear
- Here you can choose to "Proceed to Cart" to pay or "Continue Shopping"
- In our example, I would like to "Continue Shopping"
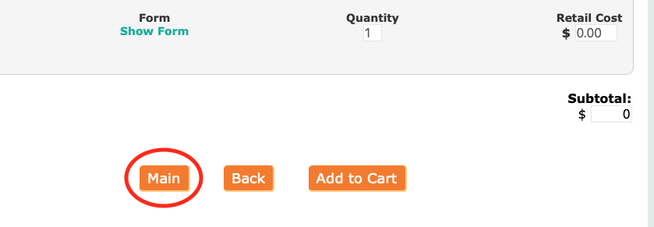
- Clicking "Continue Shopping" brings me back to the last category that I was shopping in - for me it was the PTA membership and donation page
- You can click "Back" to back out to the other categories to pay for this particular child
- Or you can click "Main" to go all the way back to the child view and select a new child
- I click "Main"
- Here we are back at the main screen where I can select another child to pay for if I did not cover them by using the "Student #2, #3, #4" lines in the pop-ups above
- Repeat Steps 4-6 for any additional children that you are paying fees for.
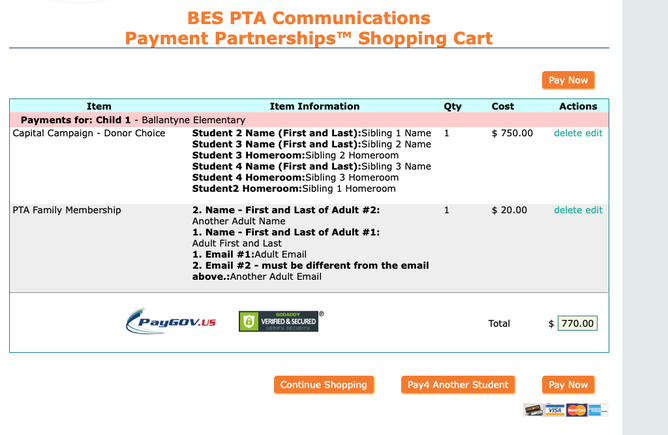
Step 7 - Shopping Cart
- In my example, I decided that I am done paying for items and I want to go check out.
- I click on the "Cart" in the upper right hand corner.
- Here is a picture of my shopping cart. Once I got here I noticed that I had chosen two different donation levels, Polar Bear for $500 and Donor's Choice for $750 and I did not want to pay for both so I clicked "delete" next to the item I wanted to remove - the Polar Bear donation level.
- Now that the two items I would like to pay for are in view I can check over the "Item Information" fields that I entered on the pop-ups
- It all looks good and the total looks correct so I am ready to click "Pay Now"
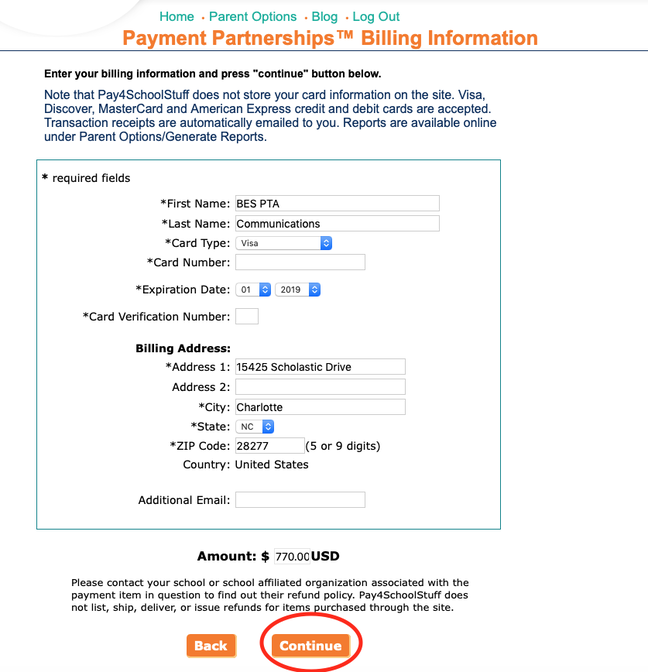
Step 8 - Credit Card Information
- Once you have clicked "Pay Now" you are brought to the billing information screen
- Enter your credit card information and make sure your name and address are correct
- Click "Continue"
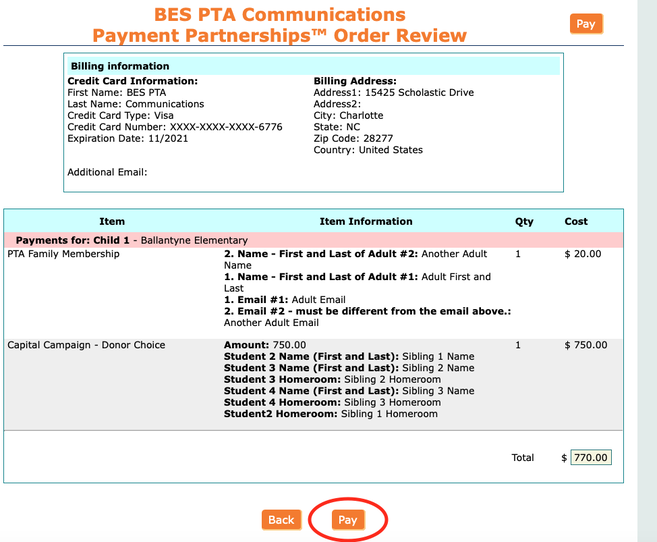
Step 9 - Final Review
- This is your final chance to review information and change your mind!
- Review everything and if the information, items and total look ok then click "Pay"
Step 10 - Confirmation
- You will receive a confirmation screen and email and you are done!
- If you have any questions or if this tutorial did not solve your problem please feel free to email us at [email protected] or contact us using the links below.
